Monday, 16 September 2013

Maple Rhubarb Pie

Went to a farm in Richmond, BC for apple picking this weekend. Wasn't to impressed with it, but we were able to get 10 lbs of baking apples and some massive rhubarb! 

My man loves strawberry rhubarb pie, but I was going to try my hand at just rhubarb. Searching the internet I found this recipe on Stephenson Maple Farms website of a rhubarb pie using maple syrup! Also it has sour cream in it so it's kinda of a cream filling! Super deliciousness! My man really likes it as well. 


The recipe is pretty straight forward, except for baking I just did it for 350 degrees for an hour or so until the rhubarb was tender.
recipe taken from stephensonmaplefarms.ca

 Massive Rhubarb!!


 Wash and cut into 1 inch chunks.


 Place into pie crust. Mix syrup, flour, sour cream, and sugar.


 Pour over the top.


 Spread around.


 Mix brown sugar, flour and melted butter with a fork until crumbly.


 Sprinkle over top of the pie.

 Bake for an hour at 350 until rhubarb is tender.


Enjoy! Yum, yum :)


Then I froze the rest of the rhubarb for winter pies in the future! Yay!

Thursday, 12 September 2013

Breakfast Burritos!!


 These are simple to make, easy to freeze and you can use a variety of ingredients! SO breakfast for the meat-lovers or vegetarian! With a quick pop in the microwave in the morning you have breakfast to go within a couple minutes!

The ones I'm making for this post are simply eggs, chicken sausage, and cheese! You can add anything breakfast or veggie related, for example: onion, pepper, spinach, bacon, ham, etc. (just make sure to cook everything before wrapping it up!)

For mine I scrambled about 8-10 eggs, cooked half a package of sausage, and grated around 2 cups of cheese. That much probably made around 8 burritos. The amount of ingredients is really up to, what you like and how much you like :)

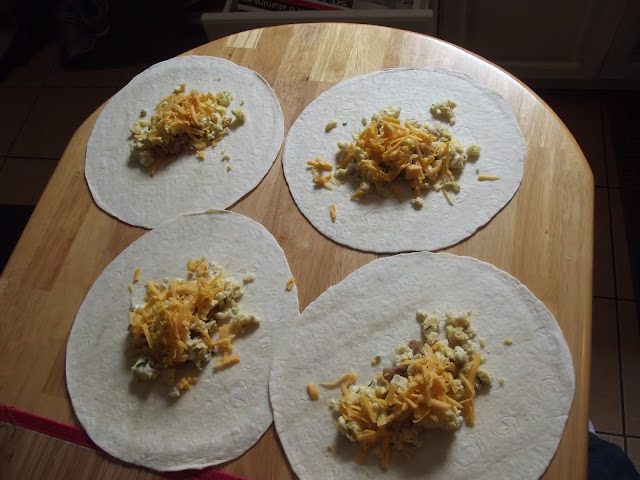
Now the fun part! Put around 2 T. each of eggs and sausages in the middle of the tortilla, and add a sprinkle of cheese.

Don't fill it too full or it will be difficult to wrap up.


To wrap it up, fold the 2 ends in, then take the end closet to you and roll it up into a burrito!

Now wrap it up in a piece of tin foil!

After you have wrapped up all of your ingredients in the tortillas and then tinfoil you are ready to put them in the freezer!


To heat up: unwrap burrito from the tinfoil and wrap up in a paper towel. Place in your microwave and heat for 1 minute and 20 seconds, depending on your microwave it could take longer. Let sit for 30 seconds to cool...then enjoy!!!!

Tuesday, 6 August 2013

ZWETSCHGEN STRUDEL (Mock Plum Strudel)

Zwetschgen, plum in German. This recipe is from my mom. No, we are not of German descent. My kids will be though, since I married a man whos great-grandparents immigrated from Germany! I should ask my mom where she got this recipe :)


Anyways, this is seriously so yummy! It doesn't seem overly sweet to me, even though it has alot of sugar. I didn't have Italian prunes on hand. Just regular purple plums, so I cut them into eighths instead of halves. Here is what you need to do:

 BATTER
1/2 C. Butter, softened
1 C. Sugar

1 egg
3/4 C. Milk
1/2 tsp. grated lemon rind (optional)
2 C. Flour
2 tsp. baking powder
12 to 15 Italian prunes (or 3 to 5 regular plums)

TOPPING
1 1/2 C. Flour
1 1/2 C. Sugar
1/2 C. Butter, softened
1/2 tsp. Cinnamon


  • Mix BATTER ingredients by first creaming butter and sugar until creamy.  
  • Add egg and beat until fluffy. 
  • Add milk and lemon, then the dry ingredients.  
  • Mix well, it will be way thicker than normal cake batter. (almost more like dough).
  • Spread evenly into a greased and floured 9 x 13" pan.  
  • Cover batter with the halves of Italian prunes (or eighths of a plum), cut side up (skin side down).  
  • Mix butter and sugar for TOPPING, then add flour and cinnamon. (it will be crumbly).
  • Cover the batter and plums with the topping mixture. 
  • Bake at 350 degrees for about 45 min.

Great for breakfast or a yummy dessert! Enjoy!

Friday, 5 July 2013

Breakfast in a Muffin

I got this recipe from the cookbook, Cookin' Up Country Breakfasts and it has now definitely become a fav! Leave out the bacon for a vegetarian option :)


1 cup whole wheat flour
1 cup all-purpose flour
1/4 cup sugar
4 teaspoons baking powder
1/8 teaspoon salt
1 cup milk
1/4 cup vegetable oil
2 eggs, divided
1 cup of cream cheese
1/4 cup shredded cheddar cheese
1/8 teaspoon salt
4 bacon strips, cooked and crumbled

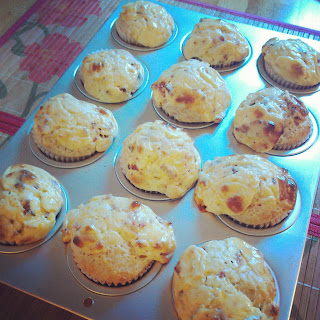
In a large bowl, combine first five ingredients. Combine milk, oil, and 1 egg; stir into dry ingredients just until moistened. Fill greased or paper-filled muffin cups half full. 


In a mixing bowl, beat cream cheese and second egg. 


Add cheddar cheese and salt; mix well. Stir in bacon. Spoon 2 tablespoons in the center of each muffin. 


Bake at 425 degrees Fahrenheit for about 15-20 minutes or until muffins test done. Serve warm. Yield: about 1 dozen. 

Tuesday, 2 July 2013

Canada Day!

Yesterday was my first Canada Day celebration in Canada! Haha! My husband and I relaxed most of the day, since it was quite hot, then we ventured out to the festivities downtown Vancouver! We took the Skytrain since parking is a headache downtown. We arrived just in time for the parade to start! I haven't seen a parade since Leavenworth's Autumn Leaf Festival so this was exciting. I don't think my husband was as excited haha! I love seeing a parade in another country. The beginning had all the military and police force marching down the street, it was so cool. The rest of the parade was mostly different nationalities and countries...China, Japan, Korea, etc. There are a lot if Asian immigrants in the Vancouver area, so was kinda cool and interesting to see! Then we walked down to the waterfront after for the firework show which started at 10:30, when it got dark. It was so awesome :) My phone died before the finale so I didn't get any pictures of that, but it was such a great finish. Then everyone started singing: "Oh, Canada" which I suspected was gonna happen haha! We then got lost in the crowd to make our way back home. There was masses of people!! The Skytrain was packed...like squished in next to the people around you, it was cray-cray! But we survived and it was great first Canada Day celebration for me :) Happy Canada Day! (Now onto the 4th of July! Woohoo!!)

RCMP!
Keep Canada Green Folks! Haha!
Darth Vader

Fireworks!!!

Wednesday, 26 June 2013

Wednesday Wraps: Turkey Spinach with Cranberry Cream Cheese


Love this delicious wrap! I made them for my sisters bridal shower and they were so easy and very tasteful! Make it and cut into slices for parties or leave it as a whole wrap for lunch. Can be made without the turkey for a vegetarian option and still be at the top of my list. If you like nuts just add 1/4 cup of chopped walnuts to the cream cheese spread. Here is what you need:

1.5 cup of cream cheese
3/4 dried cranberries, coarsely chopped
2 teaspoons of honey
1 garlic clove minced
1/2 teaspoon rosemary
salt and pepper to taste
8 (10-inch) flour tortillas
1 pound of thinly sliced turkey
4 cups of baby spinach (more spinach if you make the veggie option)

Stir together the first 6 ingredients. Spread about 2 tablespoons of the cream cheese mixture onto each tortilla, leaving a half-inch border around the edges.


Divide turkey and spinach evenly among the tortillas.
Add the spinach first so it stays on by sticking to the cream cheese.
Layer on turkey.

Roll up.

Cut into half or in slices.


Enjoy!

Thursday, 20 June 2013

Summer and Strawberry Pie

Strawberries are one of my favorite fruits! One of the reasons summer is my favorite season. It has been great to have an abundance of this sweet red fruit. This recipe rings true to the saying "easy as pie."


Easy Pleasing Strawberry Pie

3/4 cup sugar
3/4 cup hot water
2 T. cornstarch

Bring to boil, stirring continuously, until clear.
Then add 3 tablespoons of strawberry jello.
Add one quart of sliced strawberries.
Mix until all the fruit is covered by the jello.
Pour into a cooked pie crust (no top) and refrigerate!
Serve with whipped cream! 

Sunday, 16 June 2013

My Ombre Hair Tutorial

I was planning to cut my hair short again after the wedding, but my man likes my long locks. I needed to do something new though so I decided to go with color instead. I really like the ombre look and after researching and looking at the cost of having it done in a salon...yikes...I went to the drugstore, got a highlighting kit and did it myself!

I watched alot of youtube videos and read some blog  posts for most of the day haha. Everyone does it their own way which suits them, so after viewing many examples I came up with my own tutorial :)

First of all Revlon Frost and Glow seems to be the most popular choice so that is what I went with and I'm very pleased with the results. It comes in 3 different options and I got the lightest...platinum blonde :D

1. You don't want clean hair, have about day old hair so the natural oils are intact. Brush it out until your hair is tangle free. Part your hair how you usually wear it. Divide into 2 sections bringing them to the front over your shoulders.
2. Mix the highlight kit as directed in the instructions on the box. 
3. Put on the gloves that come in the kit and then grab some of the highlighting mixture saturating just the very ends of your hair. I went about 3 to 4 inches up. It depends on you hair length. Don't worry about blending it up at this point.
4. Wrap ends in tinfoil and wait. I let mine sit about 30 minutes, I think I could of went a bit longer though. Just check it periodically to see how the color is taking.
5. Rinse the ends of your hair out completely then dry completely with a blow dryer. Now it's time for the second part.
6. For the second time around I divided my hair into four sections. I split it half up and the divided the bottom half into 2 sections and brought them to the front. I started applying the highlighting cream heavily on the tips of my hair working almost all the way to the top this time since it is the bottom layer. I didn't really blend it. Wrap these 2 sections in tinfoil.
7. Next I took the top half and divided into 2 sections and applied the cream heavily at the tips working up to about 8-9 inches. This time I blended it combing my fingers through and taking a few choice pieces and going up even further. Just trying to make it more blended in and not just a straight line. Wrap in tinfoil and wait.
This time I waited almost 40 minutes. Checking periodically. 

 Rinse hair out completely and then use the shampoo and conditioner that came in the kit.
That's all folks!

            BEFORE                                  AFTER (still drying)

Final look!


 I love it!

 So does my man!